This post will guide you to download and deploy Fortinet Fortigate Image to EVE-NG Network Emulator. In this guide, I am using Windows 10 and EVE-NG in VmWare Player already configured and working properly. All the procedures are done in GUI, except for fix permission part.
Before we start, make sure you have all the requirements needed in the process below:
- Working EVE-NG Network Emulator
- Fortinet support account (It is free to register one)
- WinSCP
- SSH Client (Windows CMD with OpenSSH / PuTTY, etc)
Already have all the requirements? Let's start:
How to Download and Deploy Fortigate to EVE-NG Lab
Download Fortigate VM image for KVM
- Open your browser and go to Fortinet Support Site
- Login or Register, it is free!!!
 |
| Login or Register, it is free!!! |
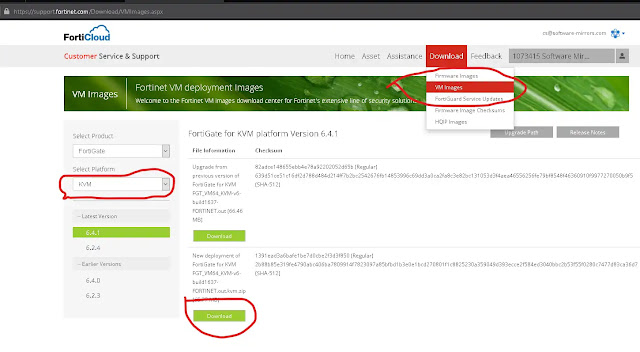
- Navigate to 'Download > VM Images'
- Select Product 'Fortigate' and Platform 'KVM'
- Click New Deployment 'Download' button
 |
| Free Download Fortigate KVM image from Fortinet Support |
- Just wait until the download finish and move to deployment
Deploy Fortigate KVM image to EVE-NG Lab
- Extract the downloaded Fortigate KVM image, you will have
fortios.qcow2file - Run your EVE-NG (if it is not already running)
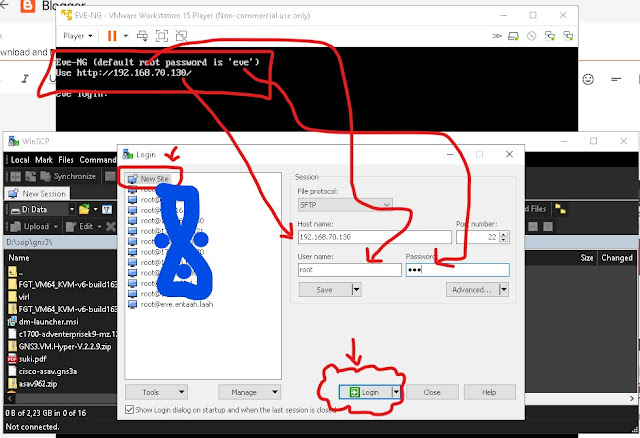
- Open WinSCP and browse your
EVE-NG server(see the picture below)
 |
| Deploy Fortigate KVM image to EVE-NG Lab |
- Using WinSCP, on the right pane (EVE-NG server), browse to
/opt/unetlab/addons/qemu - Create New Folder with the folder name must start with
fortinet-, for example fortinet-FGT-v6-build1637 (Ref: EVE-NG Qemu image naming)
 |
| Create New Folder with the folder name must be fortinet- |
- Open the newly created folder and upload fortios.qcow2 to the folder
- Rename fortios.qcow2 to virtioa.qcow2
 |
| Rename fortios.qcow2 to virtioa.qcow2 by right click |
Next, fix permission using ssh client
This example is using Command Prompt from Windows 10 with OpenSSH enabled. This is the only CLI command you have to do.
- Open CMD from Windows 10 ('Windows+r' type 'cmd' and enter)
- Connect to your EVE-NG server using ssh command, for example:
ssh root@192.168.70.130
- Enter root password, default is 'eve'
- Run this command to fix permission on EVE-NG server:
/opt/unetlab/wrappers/unl_wrapper -a fixpermissions
 |
| Next, fix permission using ssh client |
All the procedures are done, now we can go to EVE-NG Lab from browser and add Fortigate node to your EVE-NG Lab
 |
| Add Fortigate node to your EVE-NG Lab |
Default username for Fortigate device is admin without password, you will be force to create a password for admin at first boot.
The video for Download and Deploy Fortigate to EVE-NG Lab is not ready yet, please subscribe to my YouTube Channel to get notified when the video is uploaded. Thank you.