In order to make posts about Active Directory and how it is become a core on many companies as authentication source, I try to Install Microsoft Windows Server 2019 on VirtualBox. I am also working on a company that uses Active Directory as authentication and authorization source such as application login credential, WiFi, company role matrix, and so on.
Because it is not wise to use the company resources as an experiment, so this Windows Server 2019 on VirtualBox will be my source of experiment from now on.
How to install Microsoft Windows Server 2019 on VirtualBox 6.0
Before we start, make sure you already meet the requirement for Installing Windows Server 2019 on VirtualBox.
3. Minimum 2 GB of Memory and 40 GB hard disk space for Virtual machine
If you already meet the requirements, let's start!
Preparing VirtualBox
- Create New Virtual Machine, type the name of the Virtual Machine and choose the machine folder (I suggest you to change it to other partition than the system partition)
- Virtual machine type is Microsoft Windows and Version change to Windows 2016 (64-bit)
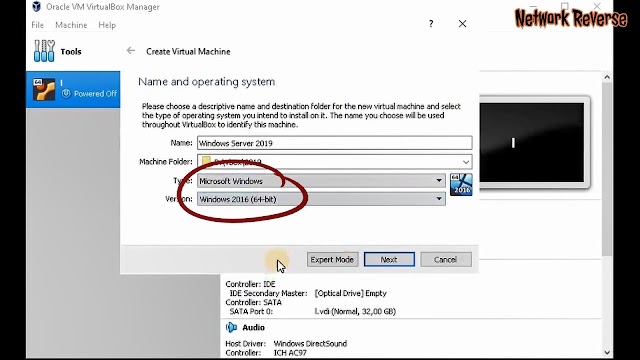 |
| Virtual machine type is Microsoft Windows and Version change to Windows 2016 (64-bit) |
- Next, choose the amount of memory. For Core Server it's need at least 800 MB when installing and can be reduced to 512 MB after installed. For Desktop Experience installation, you need the minimum of 2 GB of memory.
 |
| Choose the amount of memory |
- Next, create a new hard disk, type VDI and Dynamically allocated. For GUI Mode, you need at least 32+4 GB hard disk space. The recommendation is 50 GB.
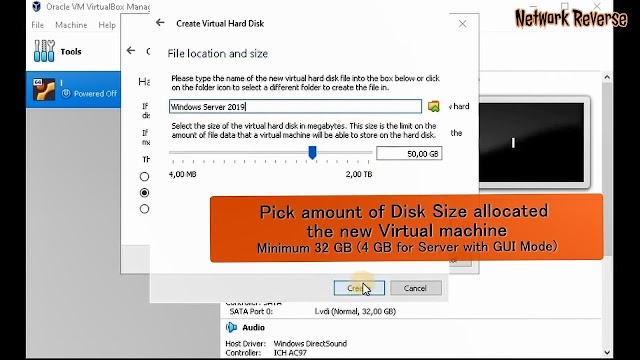 |
| Create a new hard disk, type VDI and Dynamically allocated |
- Next, go to the newly created Virtual Machine Settings
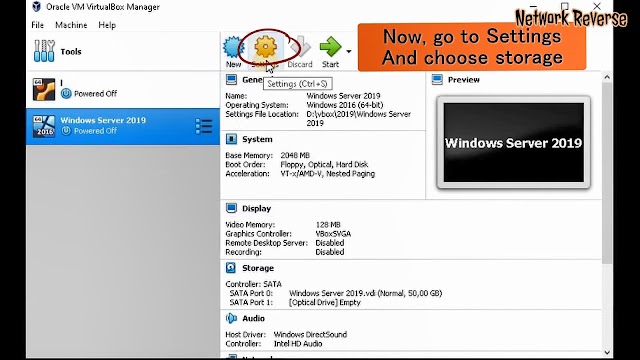 |
| Newly created Virtual Machine Settings |
- On the Settings Window, navigate to 'Storage', Storage Device, choose optical drive icon and on the attributes, Choose Virtual Optical Disk file...
 |
| Choose Virtual Optical Disk file... |
- Find and choose the Microsoft Windows Server 2019 ISO image (download link above). Click Ok, and Start the Virtual Machine
 |
| Find and choose the Microsoft Windows Server 2019 ISO image |
Microsoft Windows Server 2019 Installation
- Choose the Language, Time and Currency format and Keyboard layout you prefer, and click Install now
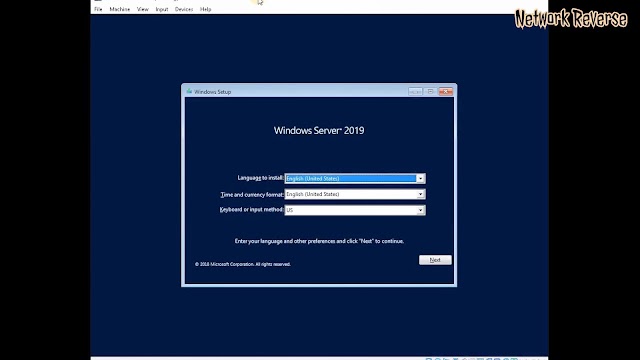 |
| Choose the Language, Time and Currency format and Keyboard layout |
- Select operating system you want to install, you can read the description for every option. For full GUI, choose the option with Desktop Experience...
 |
| Select operating system you want to install |
- Next, End user license agreement. Make sure you already read all the terms before "Accept" and click Next.
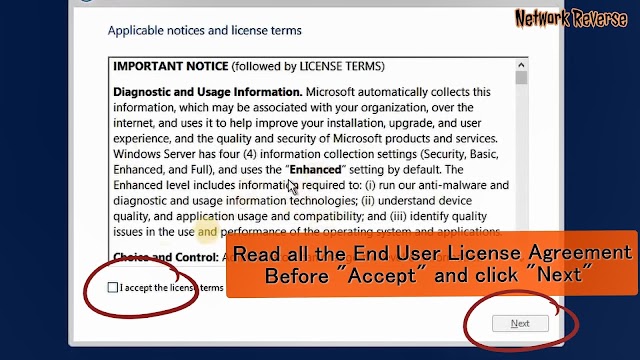 |
| End user license agreement |
- Next, Choose Custom: Install Windows Only (advanced) for new Windows Server 2019 Installation
 |
| Choose Custom: Install Windows Only (advanced) for new Windows Server 2019 Installation |
- Next, Choose the drive where the Windows Server will be installed and click Next. (we can do the partitioning later after installed)
 |
| Choose the drive where the Windows Server will be installed |
- Next, the installation process take 20 minutes before it restarts several times in this tutorial. Just wait.
- Create new password for Administrator user. Read this article from Microsoft for Password Complexity Requirements. Or just use at least 8 characters with uppercase, lowercase and number. You can change it later.
 |
| Create new password for Administrator user |
- Wait for Finalizing Windows Installation.
- To login to Windows Server 2019, you need to press "CTRL+ALT+DEL". In VirtualBox "CTRL+ALT+DEL" replaced with "Host+DEL" (Default host key is Right CTRL key)
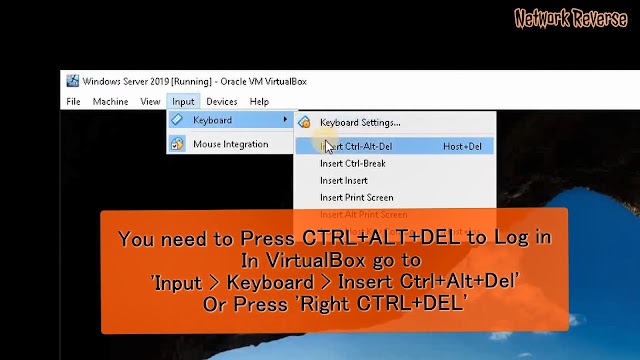 |
| VirtualBox "CTRL+ALT+DEL" replaced with "Host+DEL" (Default host key is Right CTRL key) |
- Insert your Administrator Password and you are done Installing Microsoft Windows Server 2019 on VirtualBox 6.0.
This video from Youtube below shows you all the steps that I have done on Installing Microsoft Windows Server 2019 on VirtualBox 6.0 and also some sneak peek on the server. Please comment if you still have problems.